Cross-platform installation as microservice
You can use File Uploader in your project regardless of the actual programming language and technologies your website is built with.
The idea is that you start an HTTP-server of the uploader independently of the HTTP-server of the main website, and then link them. File Uploader can run the client part (dialog) from one host, and upload file to the other one.
Installing the uploader server
This could be any back-end among those we offer. It doesn't matter what framework you use: Node, PHP, Java, etc.: in any case start a new instance of the server with the corresponding server part of File Uploader.
We recommend using the Node.js version because it simplest to install (start with just one command node uploader.js from any directory).
This is our microservice - it serves only the uploader via HTTP. There are several ways to query it.
Method 1. Installing on a separate host.
Simply start the microservice on a separate host and specify its URL as urlUploader.
This way is especially efficient when you are planning to host images separately anyway, for example on a subdomain http://img.website.com.
Also, starting the microservice on a separate host does not oblige you to address the uploaded files using the subdomain URL. If both hosts physically are on the same server (or you mount the directory with file via network), you can configure the main website to fetch the files from there, and in the client redefine urlFiles accordingly.
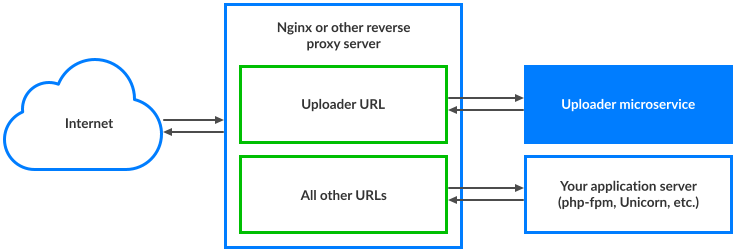
Method 2. Installing on the same host using HTTP reverse proxy.
If your website works on Nginx, this is a classic example of a reverse proxy. The reverse proxy will transmit client requests to the inner servers that serve the website. This is how the bulk of websites redirect requests from Nginx to php-fpm (PHP), Unicorn (RoR) and so forth. The same technique can be applied to other servers too, like Apache.
That is, you define the URL that 'faces' the front-end network and specify that URL on the client as urlUploader. In the reverse proxy, you set this URL as processed by the back-end server. The back-end server has its own URL unavailable from the external network, so the main server should query this URL. For instance, Node.js server-side by default has it http://localhost:7777/uploader.
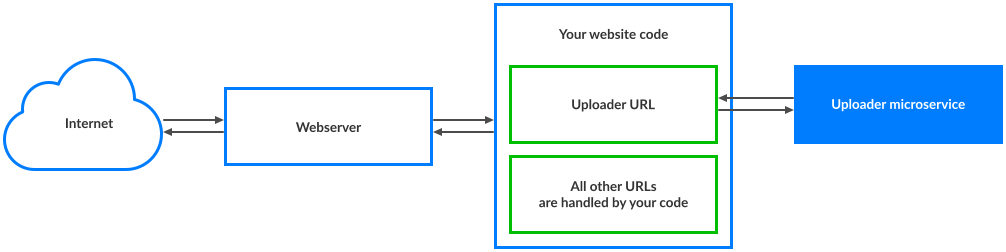
Method 3. Access from the code of your website.
This is a variety of the second method, but here we use the code of your website as a proxy.
When you serve the chosen URL, redirect all POST variables to the URL of the microservice and wait for its response. What File Uploader microservice returns (body and headers), return back to the client.